


One of my favorite ways to shake up clients’ workouts is to make push-ups more challenging with a resistance band.
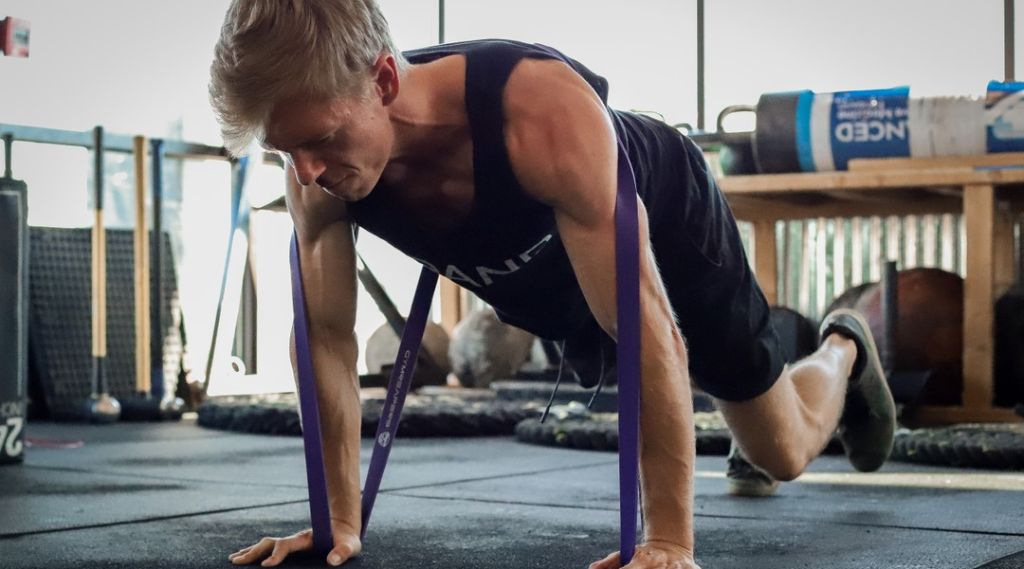
Banded push-ups are an advanced variation where trainees wrap a band over their hands and behind their backs for extra resistance. The band provides increasingly more tension as it lengthens, making the top of each repetition more challenging. As a result, this push-up variation can lead to great muscle activation.
Learning how to do banded push-ups, how to implement them into your training, and what five mistakes to avoid is necessary for optimizing your results and steering clear of injuries.
Key Takeaways
- Band push-ups are an upper body exercise that primarily trains the chest, shoulders, triceps, serratus anterior, and core musculature.
- Using the wrong band, placing it incorrectly behind your back, and shortening the range of motion are three of the most common band push-up mistakes.
- Having a set of bands with different levels of resistance to choose from allows you to find the appropriate level of resistance to train your push-ups and facilitates progression over time.
Muscles Worked With Push-Ups

Push-ups are an upper body exercise that primarily trains the pectoralis major (chest), deltoids (shoulders), triceps, and serratus anterior.
Other muscle groups involved in push-ups include the midsection (abs, obliques, transverse abdominis, etc.), erector spinae, and gluteus maximus. These muscles primarily serve to keep your body rigid through isometric contraction (exerting force to maintain their position).
Depending on the push-up variation, you could emphasize specific muscles over others.
For example, pike push-ups emphasize the upper chest (clavicular head) and shoulders, whereas incline push-ups place more tension on the middle and lower chest.
Additionally, close-grip push-ups put more emphasis on the triceps than regular or wide-grip push-ups.
Regardless of the variation you choose, push-ups are a great exercise to build upper body strength and encourage growth (hypertrophy), especially when performed with a band.
How To Do Push-Ups With Bands: Step-By-Step Guide
The primary difference between regular push-ups and push-ups with bands is that you feel significantly more resistance as you get close to the top of each repetition when you’re using bands.
“So, when the push-up is easiest (towards the top), the band will provide you with more tension, and when the push-up is in the hardest position (toward the bottom), the band provides less tension.
This will improve your strength through the top range of motion, exactly where it needs it. What’s more, it will allow you to get a far better contraction.”
Here are step-by-step instructions for performing banded push-ups properly:
- Take a looped resistance band of your choice. The thicker it is, the more resistance it will provide, making the exercise more challenging.
-
Get down on your knees, grab both ends of the band, and bring it over your head and behind your back.
-
Position the resistance band against your upper back, directly over your shoulder blades, holding both ends securely in your hands.
-
Lean forward and place both hands flat on the floor, ensuring the band is secure on your back and unlikely to slip.
- Extend your legs to support your lower body on your toes. At this point, you should be in a high plank position.
- Squeeze your glutes and engage your abs to prevent your lower back from arching
- Take a deep breath and descend as much as you can by bending your elbows; ideally, your face will be an inch or two from the floor at the bottom position.
- Pause briefly and push yourself back to the top, fully extending your arms. Exhale.
-
Optional: As you reach the top, use the mental cue of pushing the floor away to protract your shoulder blades, which would cause your upper back to round. Adding that extra movement at the top can help strengthen the upper back (and scapula), and engage the serratus anterior more, which can improve your shoulder stability.
Related Articles:
5 Common Banded Push-Up Mistakes
Banded push-ups are not a complicated exercise, but there are some common mistakes that I often see athletes make.
Mistake #1: Using The Wrong Band
Using the wrong band is perhaps the biggest and most common mistake trainees make when performing banded push-ups.
Some trainees attempt to do the exercise with an open-ended resistance band, which doesn’t work. An open-ended band is much longer than a looped one and doesn’t stretch enough to provide the appropriate resistance for push-ups.
Another error in band selection is picking a looped band that offers too much or too little resistance, which keeps you from doing the exercise correctly and reaping all the associated benefits.
How to Fix
Pick a looped resistance band that provides the right amount of resistance. The right amount of resistance should feel challenging, but not so challenging that you can’t lock out your elbows at the top of the movement.
One practical way to find the perfect resistance is to get a resistance band set, like this one from Gymreapers. Having multiple bands makes it easier to experiment and see which one provides the right amount of resistance.
Mistake #2: Incorrect Band Placement
Another common error is placing the band too low or too high on your back. Positioning the band too high on your upper back makes it more likely to slip and hit your neck, which can be unpleasant.
Similarly, having the band too low can affect your movement mechanics and place more stress on your shoulders (not in a good way).
How to Fix
Place the resistance band in the middle of your upper back, directly against your shoulder blades. This position will keep the band from moving up or down during a set and ensure that you’re performing the movement properly.
You will likely have to experiment with your band placement to find the “sweet spot”, so don’t get discouraged if it slips up or down the first few times you try this exercise.
Mistake #3: Shortening The Range Of Motion
Just as some athletes do with regular push-ups, a common mistake with band push-ups is shortening the range of motion.
When you don’t have the strength to complete a full repetition, you may have to “cheat” the movement by not lowering all the way down or stopping short at the top of the movement.
Failing to complete full repetitions is not ideal because you fail to train your muscles through the full range of motion, reducing the training stimulus and leading to suboptimal results.
How to Fix
The fix here is straightforward: pick a light enough band to do full range of motion push-ups. If you struggle to perform push-ups as it is, then ditch the band for now and come back to it once you’re more proficient.
There is no point in making the exercise more challenging if bodyweight push-ups are enough to provide a good stimulus and create an overload.
Mistake #4: Buttocks Sagging
Improper body alignment is another common error during band push-ups that typically comes in the form of a sagging butt.
In other words, the hips aren’t in alignment with the rest of the body, which affects your stability and places unnecessary stress on the lower back.
In addition to potentially leading to nagging back aches, an improper position can affect your performance and training outcomes.
How to Fix
Prevent buttocks sagging and ensure proper alignment by engaging your core muscles before each repetition. Plant your hands on the floor, extend your legs, squeeze your glutes, and tense your abs, drawing your belly button toward your spine.
Before I start my rep, I like to think about taking a deep breath into my core that causes my core to expand 360 degrees. This technique (aka belly breathing to increase intra-abdominal pressure) allows me to maintain tension through my core to ensure my body remains in a plank-like position as I perform the movement.
Mistake #5: Flaring Your Elbows
The final mistake to be mindful of when performing banded push-ups is elbow flare, which means pointing the elbows to the sides. Having your elbows in this position is not good because it places unnecessary stress on the shoulder joint, increasing the risk of impingement.
Having the elbows at the correct angle is crucial for a stronger and more stable position when performing any type of push-up. Additionally, proper elbow positioning can lead to better chest muscle activation and more growth.
How to Fix
When setting yourself up for the banded push-ups, place your hands flat on the floor with your fingers pointing forward and slightly out. Doing so automatically brings your elbows in.
Additionally, position your hands slightly lower in relation to your torso. Your hands should be at the sides of your lower chest when you descend to the bottom.
To assess your positioning, have someone take a video of you performing your push-ups from two different angles: a top-down view and a side view.
With a top-down view, you can see the angle of your elbows in relation to your body. Aim for a 45-degree angle.
With a side view, you can see whether your hips are in-line with the rest of your body (mistake #4) and the position of your hands in relation to your elbows. Aim to have your wrists stacked directly under your elbows in the bottom position of your push-up.
Implementing Banded Push-Ups Into Your Training Routine

Band push-ups can be a fantastic addition to your training routine when implemented correctly.
Here are a few quick tips on how to implement them:
Sets & Reps
I recommend doing four or five sets of band push-ups at a time, with one to two minutes of rest between each set; this gives you more time to get in the groove and perform the exercise effectively.
Doing three sets or less at a time might not be enough to fall into a rhythm and get the most out of the activity.
As for reps, it’s generally best to leave two to three in the tank (RPE 7 or 8) to create a good stimulus without generating too much fatigue. However, the number of reps that is best for you will depend on your goals (strength, hypertrophy, or endurance) and the bands you have available to you.
Load/Resistance
The amount of resistance that you choose to use for your push-ups will come down to your abilities and preferences.
If you can bang out a set of 50 bodyweight push-ups, then use a thicker band that brings you down to 25 challenging reps.
If you can do around 30 reps of bodyweight push-ups at a time, the same band could take you down to sets of 10 reps.
Choose a load that allows you to complete the number of reps you desire based on your goal:
- For strength: aim for at least 8 to 10 reps per set
- For hypertrophy: aim for 10-20 reps per set
- For endurance: aim for 20+ reps per set
Having multiple resistance bands is valuable because you can pick from several levels of resistance and experiment to see what feels best.
Frequency
You should do banded push-ups one to three times per week, depending on how your training split is set up. Performing the exercise more frequently could lead to recovery issues and contribute to overuse injuries.
Exercise Order
Doing band push-ups early in your workouts while you’re still fresh is generally best. Doing so ensures better performance (more productive sets and reps) with proper form. This leads to a stronger growth stimulus and better progression over time.
Here is what a sample push workout could look like with band push-ups included:
|
Exercise |
Sets |
Reps |
Rest Period |
|
Banded push-up |
4 |
12-15 |
120-150 seconds |
|
Seated dumbbell shoulder press |
3 |
12-15 |
90-120 seconds |
|
Incline dumbbell bench press |
3 |
12-15 |
90-120 seconds |
|
Lateral dumbbell raise |
2-3 |
15-20 |
60-90 seconds |
|
Cable tricep extensions |
2-3 |
15-20 |
60-90 seconds |
Variations
Performing two or more banded push-up variations is an effective way to keep overuse injuries at bay. Like regular push-ups, you can change your hand stance, tempo, and body angle to tweak muscle activation.
Here are some banded push-up variations and the areas of focus:
- Decline push-ups (upper chest)
- Incline push-ups (lower chest)
- Close-grip push-ups (triceps)
Best Bands For Push-Ups

I highly recommend investing in the Gymreapers’ Military Band Set because these bands are easily one of your best options for push-ups and any other banded movements you may want to incorporate.
First, these are looped bands that work the best for push-ups because they provide the appropriate resistance.
Second, you can pick from five tension levels:
- Desert Tan - 20 to 35 lbs.
- OD Green - 30 to 60 lbs.
- Dark Earth - 40 to 80 lbs.
- Ranger Green - 50 to 120 lbs.
- Coyote Brown - 60 to 150 lbs.
With such a selection of resistance, you can experiment to see which band offers the right amount of resistance for your push-ups and gradually work up to Ranger Green or even Coyote Brown as you get stronger.
Plus, these bands are incredibly versatile as a whole. You can use them for band push-ups, but you can also do many other exercises to train your forearms, biceps, chest, back, shoulders, lower body, and more.
Leave a comment
All comments are moderated before being published.
This site is protected by hCaptcha and the hCaptcha Privacy Policy and Terms of Service apply.